Introduction to the basic functionality of the Cal-Adapt Python Toolbox and the Cal-Adapt Library (helper module)
This notebook will demostrate how to query the Cal-Adapt API using custom Area of Interests (AOI) derived from gis data (points, lines, and polygons).
To use the Cal-Adapt Python Toolbox and the Cal-Adapt Library (helper module) please do the following
Download the zip file from github and uncompress the zip file into your project folder. For ArcGIS, load the python toolbox into your ArcGIS Project and use the tools in the toolbox. For Python, import the libarary and use the different modules as needed.
To query the Cal-Adapt API using custom Area of Interests (AOI) and to chart the results using the CalAdapt Python Toolbox with ArcGIS Pro
To get data from the API
Open the Get Data from API in the Cal-Adapt - API Toolset, populate the parameter in the toolbox (see
image below), and execute the tool by clicking run.
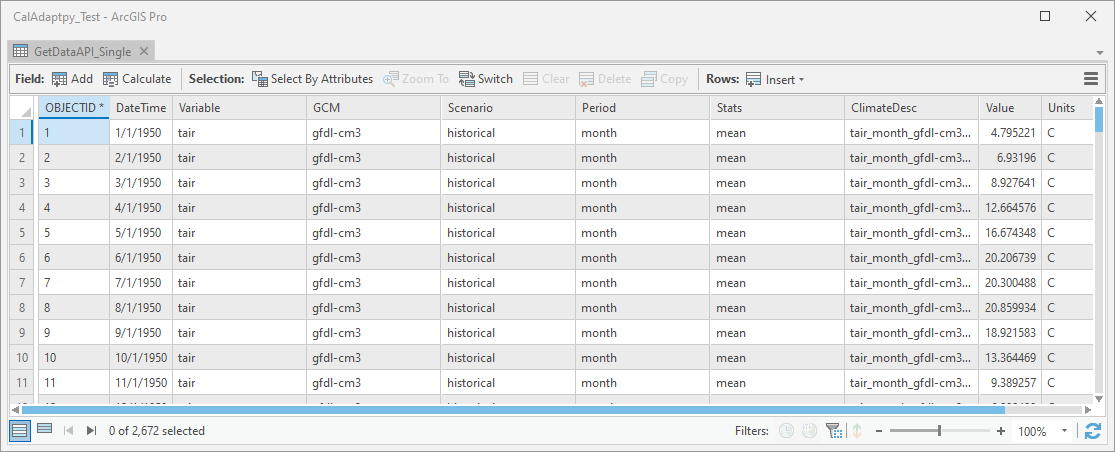
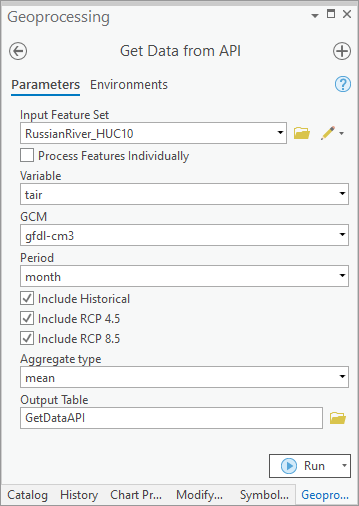 After the tool successfully runs the data returned from the Cal-Adapt API will be saved in the File
Geodatabase you specified in the tool.
After the tool successfully runs the data returned from the Cal-Adapt API will be saved in the File
Geodatabase you specified in the tool.
To chart the results returned from the API
Open the Chart Data from API in the Cal-Adapt - API Toolset, populate the parameter in the toolbox (see
image below), and execute the tool by clicking run.
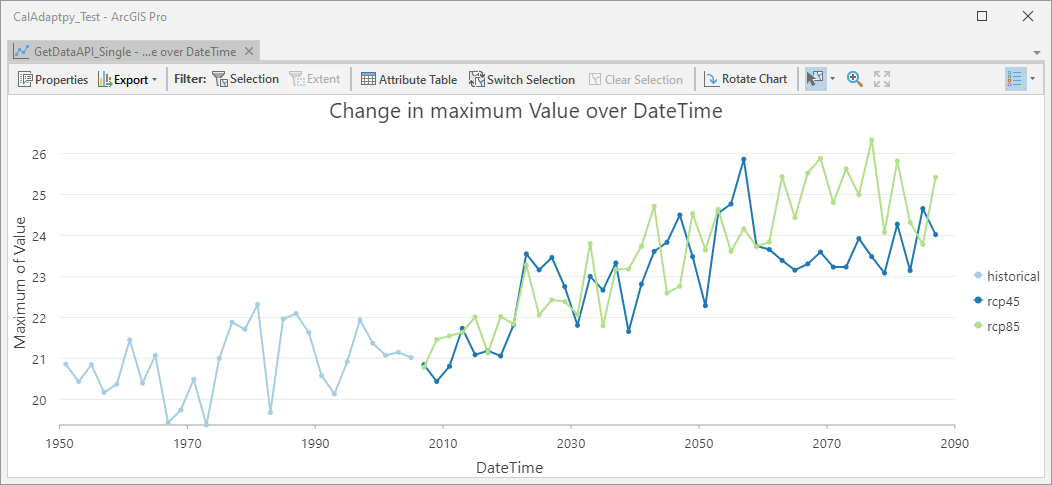
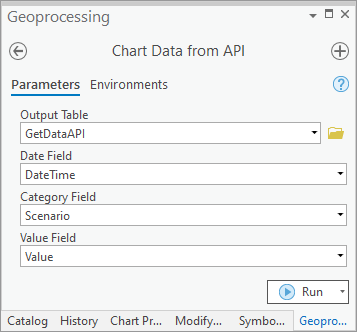 After the tool successfully runs the chart will be added to the map within ArcGIS Pro. Open the chart and
it will look similar to the image below.
After the tool successfully runs the chart will be added to the map within ArcGIS Pro. Open the chart and
it will look similar to the image below.
To query the Cal-Adapt API using custom Area of Interests (AOI) and to chart the results using the CalAdapt Python Toolbox using a Jupyter Notebook (Python) inside or outside ArcGIS Pro.
import os
import arcpy

# Import Cal-Adapt Python Toolbox into the Jupyter Notebook
arcpy.ImportToolbox(r'D:\Data\ArcGIS\Projects\CalAdaptpy_Test\CalAdaptLib\CalAdapt.pyt','')

# Import Cal-Adapt Library into the Jupyter Notebook.  This library exposes helper functions that are used to work with the Cal-Adapt api and Cal-Adapt Data Server
import CalAdaptLib as cal

# Custom Area of Interest (AOI), in this case the Russian River Basin in the north coast of California
polygon = r'D:\Data\ArcGIS\Projects\CalAdaptpy_Test\CalAdaptpy_Test.gdb\RussianRiver_HUC10'

# Run the Get Data from API Tool fropm the toolbox.  The result will be added to the map that is in your project
arcpy.GetDataAPI(polygon, None, '', "tair", "gfdl-cm3", "month", True, True, True, False, "mean", r"D:\Data\ArcGIS\Projects\CalAdaptpy_Test\CalAdaptpy_Test.gdb\GetDataAPI_Single")
# Run the Chart Data from API Tool from the toolbox.  The result will be added to the map that is in your project
# Needs to be run from within ArcGIS Pro

arcpy.CreateChart("GetDataAPI_Single", "DateTime", "Scenario", "Value")
The GetDataAPI tool in the toolbox will retrieve data from the Cal-Adapt API for one GCM. If you want to analyze more than one GCM for a AOI you have two options.
- You can run the tool twice with different GCMs and save the results in different tables. You must save the results to different tables, because GetDataAPI tool will overwrite the data in the table with each run. How ever if you use the next method you will not overwrite the data in the table.
- Or, you can use python and the helper function in the Cal-Adapt library to complete your tasks.
The steps to complete this task using the Cal-Adapt library are the following:
- Refresh Resource List from API (if resource list is older than 1 week, the function will refresh list)
- Create a Well Known Text (WKT) of your area of interest (AOI)
- Query resource list to get resource to query on the Cal-Adapt API
- Return data from the Cal-Adapt API
- Create table in File Geodatabase and save results in table
- Create chart of results
1. New resources are being added to the Cal-Adapt API all the time. To account for this the Cal-Adapt Python Toolbox and Cal-Adapt Library queries the API and generates a list of available resources for the tools. The tools refresh the resource list if the list on the computer is older than 1 week.
# get the local path to the Cal-Adapt Library, the resourcelist is stored there as well
libPath = os.path.dirname(cal.__file__)
resourceFile = ('%s/%s') %  (libPath, 'datasets.txt')
cal.freshResourceList(resourceFile)
2. The Cal-Adapt API has been designed to work with custom Areas of Interest (AOI). These AOIs can be represented as geojson or Well Known Text (WKT). The Cal-Adapt Python Toolbox and Cal-Adapt Library utilizes WKT to represnt the AOI geometries. The cal.createWKT() will take a point, line, or polygon dataset and generates a WKT representation for use in the tools.
Note the maximum size of an AOI is the size of San Bernadino County (20,105 mi²).
help(cal.createWKT)

geom = r'D:\Data\ArcGIS\Projects\CalAdaptpy_Test\CalAdaptpy_Test.gdb\RussianRiver_HUC10'
wkt = cal.createWKT(geom)

# Uncomment to see WKT
# wkt[0][0]
3. The Cal-Adapt API serves many datasets via the API. These datasets can be retrieved based on the predefined names. The cal.getResourceName() function will take a series of parameters to help narrow down the list of resources for you analaysis.
Not all parameters of the function need to be populated for it to return results. You will need to narrow your reults down to one option before running the folling tools
help(cal.getResourceName)

variable='tair'
gcm='miroc5'
period='month'
scenario='rcp45'

CalAdaptFilename = cal.getResourceName(resourceFile, variable, gcm, period, scenario)

# Uncomment the following line to see the results is not all paramters are completed.
#cal.getResourceName(resourceFile, variable='tair', gcm='miroc5', period='month')
4. Using the data generated in the previous 2 steps to query the Cal-Adapt API. Use the cal.returnData() function to request data from the API. One additional parameter needs to be set, this paratmeter is the stat parameter. The Cal-Adapt API will summarize all the cells with your AOI and report back the statistic that you request. Potential statistics include max, mean, median, min, and sum.
help(cal.returnData)

stat = 'mean'

results = cal.returnData(wkt[0], stat, CalAdaptFilename[0])

# Uncomment to see results
#results
5. The previous step returned the results from the Cal-Adapt API. Now lets create a table in a File Geodatabase and save the results in the table.
help(cal.createTable)

workspace = r"D:\Data\ArcGIS\Projects\CalAdaptpy_Test\CalAdaptpy_Test.gdb"
tableName = "GetDataAPI1"

chartParameters = cal.createTable(results,workspace,tableName, wkt, variable, gcm, scenario, period, stat)

# Uncomment to see chartParameters returned from the createTable function
#chartParameters
6. The final step is to visualize the results via a chart. Use the following tool to create a chart in ArcGIS Pro. This tool can use the object returned from the createTable function to populate the chart parameters.
Note this tool will only work if run from within ArcGIS Pro
help(cal.createChart)

# Needs to be run from within ArcGIS Pro
#cal.createChart(chartParameters[0],chartParameters[1],chartParameters[2],chartParameters[3])
Let's take all that we learned above and create a small script to query the Cal-Adapt API for 2 Global Climate Models and 3 different Scenarios and save the results in a table in a File Geodatabase.
libPath = os.path.dirname(cal.__file__)
resourceFile = ('%s/%s') %  (libPath, 'datasets.txt')
cal.freshResourceList(resourceFile)

workspace = r'D:\Data\ArcGIS\Projects\CalAdaptpy_Test\CalAdaptpy_Test.gdb'
geom = r'D:\Data\ArcGIS\Projects\CalAdaptpy_Test\CalAdaptpy_Test.gdb\RussianRiver_HUC10'
tableName = "GetDataAPI_Multiple"
gcms = ['gfdl-cm3','miroc5']
scenarios = ['historical','rcp45','rcp85']
variable='tair'
period='month'
stat = 'mean'

wkt = cal.createWKT(geom)

table = '%s/%s' % (workspace, tableName)

if (arcpy.Exists(table)) == True:
    arcpy.management.Delete(table)

for gcm in gcms:
    for scenario in scenarios:
        CalAdaptFilename = cal.getResourceName(resourceFile, variable, gcm, period, scenario)
        results = cal.returnData(wkt[0], stat, CalAdaptFilename[0])
        chartParameters = cal.createTable(results,workspace,tableName, wkt, variable, gcm, scenario, period, stat)

try :
    cal.createChart(chartParameters[0],chartParameters[1],chartParameters[2],chartParameters[3])

except OSError as error :
    print("createChart needs to be run from within ArcGIS Pro")
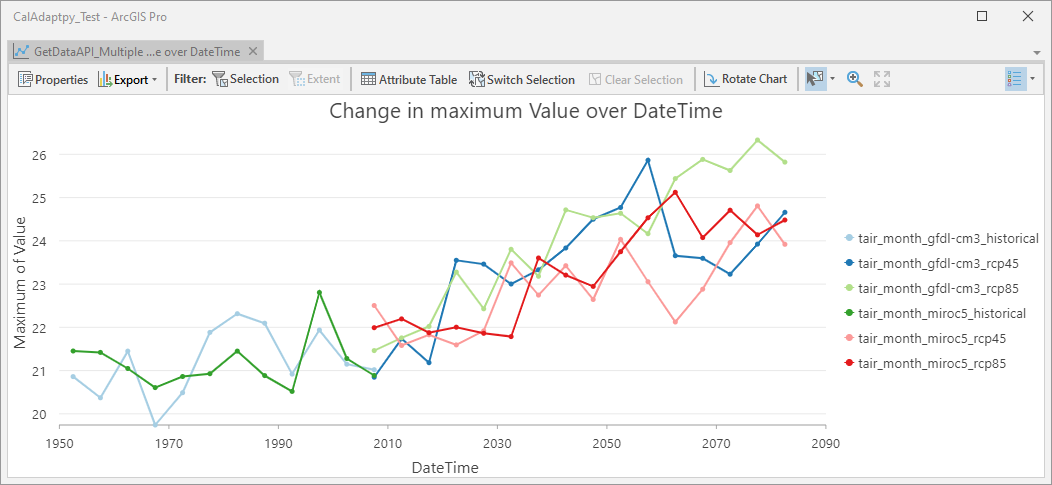
After the script successfully (in ArcGIS Pro) runs the chart will be added to the map within ArcGIS Pro.
Open the chart and it will look similar to the image below.