Computer Setup
Setting up RStudio
If you would like to do the hands-on exercises during the workshop (recommended but not required), you have two options. You can run RStudio Desktop on your own laptop / desktop computer, or you can run a RStudio virtual machine from RStudio Cloud (i.e., in a browser). Both options are free and fairly easy to set up.
RStudio Cloud
The easiest way to do the workshop exercises is using RStudio Cloud. This is recommended for beginners and anyone who hasn’t touched R in a while. With RStudio Cloud, all you need to do is set up an account. You don’t have to install or update R and RStudio, install packages, download data, or any other set up. All the workshop materials will be waiting for you in a VM prepared by the instructor. If you never used RStudio Cloud before, it’s well-developed and looks and feels nearly identical to RStudio Desktop.
You can create a free account on RStudio Cloud using an email address or your Google or GitHub credentials. The free plan offers 25 hours of usage per month, which is more than enough for the workshop. Once your account is setup, you’re done for now. The day before the workshop, the instructor will send out a link for the workshop VM, which you can click on to make a copy of it in your own RStudio Cloud workspace. All the required packages, R notebooks, and data will be ready to go.
RStudio Desktop
You can also run RStudio on your laptop. If its been more than 3 months since you updated R or RStudio Desktop, please update them both. You should be using R version 3.6 or later.
Windows users also need to install RTools in order to install packages from GitHub (which includes caladaptR). As far as we know, all of the packages we’ll be using (including caladaptR) should work fine on Windows, MacOS, and Linux.
After you’ve updated R and RStudio, please run this script to install all the needed packages including caladaptr and caladaptr.apps. You can copy-paste the commands into RStudio and run the commands. This could take 15 minutes or longer so don’t wait until the day of the workshop to start. If you get an error message installing any of the packages, please contact the instructor.
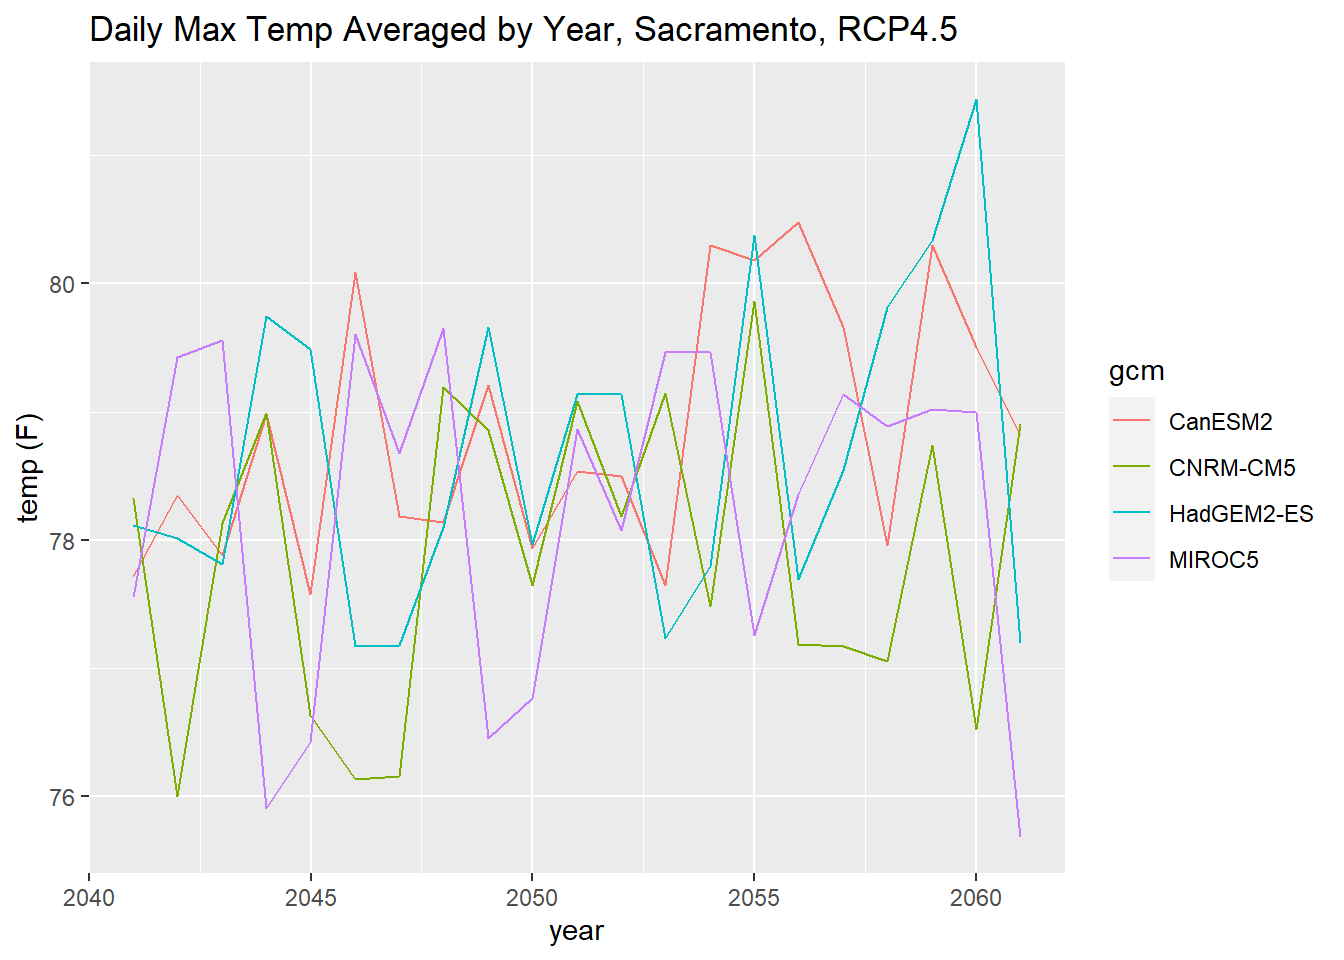
The setup script also fetches some data using the Cal-Adapt API, so if you see a plot at the end it means its working.
If you see this plot at the end of the setup script, it means everything is working:
Workshop Data and Materials
All workshop materials will be posted on this website.
To download the R Notebooks and other files we’ll be using during the workshop, please do one of the following:
RStudio Cloud users
- click on this link: https://rstudio.cloud/project/2709500
- after the project opens in your RStudio Cloud workspace, click the ‘Save a permanent copy’ button
- click on the files pane in RStudio. The R Notebooks we’ll be using will be in the ‘Notebooks’ directory.
RStudio Desktop users
- run the following command at the console, substituting where you want the workshop folder to go. The total size of the workshop data is ~120MB.
zip_url <- "https://ucdavis.box.com/shared/static/vhp9fldkt8xv1wqb3ejdqllgpo7wfrt4.zip"
usethis::use_course(zip_url, destdir = "c:/path/goes/here")
## omit destdir to put the workshop folder on the desktop
Using Two Monitors
A second monitor is strongly recommended so you can view the instructor’s screen in one monitor while you run R on the other. A tablet might suffice as your ‘Zoom’ device while you run R on your laptop.
If you’re truly limited to just one screen, check out these tips for viewing Zoom and an application window side-by-side.