Using Cloud Services for Persistent Storage for Shiny Apps Part 1: AWS S3
IGIS Tech Notes describe workflows and techniques for using geospatial science and technologies in research and extension. They are works in progress, and we welcome feedback and comments.
Summary
When you publish a Shiny app to ShinyApps.io or another hosting platform, you may or may not have the ability to store data on the server between sessions. If you need persistent storage, you can turn to cloud storage services such as Google Cloud or AWS s3. This Tech Note describes how your R projects can work with cloud services safely and securely, and the specific steps for setting up S3 to store data.
Background
ShinyApps.io is a great platform from Posit for hosting Shiny apps, but it has one major drawback - the lack of persistent storage. Persistent storage refers to the ability of your app to save data more or less ‘permanently’, so that it can be read by future sessions of your Shiny App, or other programming tools.
Persistent storage often isn’t needed for Shiny apps, but it’s essential if:
- The purpose of your Shiny app is to collect data from users (e.g., a glorified Google Form)
- The app requires data created in previous sessions
- Your app creates a custom log that you want to save to disk for analysis
Persistent storage isn’t available on platforms like ShinyApps.io which essentially fires up a brand new session of your Shiny app every time someone connects to it. This means the only files you can count on being available are those that you uploaded when you published your app.
Fear not however! This Tech Note describes how you can “wire-in” storage from Google Drive or AWS S3 to a Shiny App hosted on ShinyApps.io. Note that what we are discussing here is saving files to Google Drive or S3. If the data you want to save is structured and lends itself to being stored in a database, see the excellent blog post by Dean Attali Persistent data storage in Shiny apps.
Using Cloud Storage in your Shiny App Safely
Whether you’re working with Google Drive, AWS, or some other cloud storage provider, you’ll most likely have to write code to authenticate with the provider before you can do anything else. You could in theory authenticate with your Google username and password, but this would be a horrible idea. If someone got a hold of your code, they could not only upload and download files to your Google Drive, they could also potentially get into your Gmail, Google Docs, and anything else you do with Google. The same is true with AWS, DropBox, and other cloud services.
How do web app developers deal with this? Fortunately, companies like Amazon and Google have put a lot of effort into best practices for making data transfers with web apps safe and secure. Although there is no way to completely eliminate all risks, following these practices will significantly reduce the likelihood of credentials getting loose, and greatly mitigate the consequences in case someone gets access to your credentials.
There are four general strategies that you can use:
- Use service accounts (so you don’t give away the kitchen sink)
- Use temporary credentials
- Assign the absolute minimum level of permissions needed (to contain the damage from a leak)
- Don’t put credentials in code or version control
1. Create Service Accounts
Service accounts (also called IAM accounts in the AWS universe) can be thought of as “sub-accounts” of your main Google or Amazon account. Just like your main account, they’ll have the equivalent of a username and password (although these might be called other things, like token, public and private keys, etc.). However unlike your main account, you only give them access to very specific things (like storage services). Thus even if someone got the credentials for the service account, they couldn’t get into anything the service account wasn’t provisioned with.
2. Use temporary credentials
Some cloud service have the option (or may even require) authenticating with a temporary token instead of service account credentials to access the platform. In a Shiny app, this probably means your “preamble” code in app.R would pass your service account credentials to an API, and get back a token that might be valid for only two hours. You then use that token when making subsequent calls in the session.
3. Limit Permissions
The Googles and AWSs of the world have dozens of cloud services (e.g., Google has Google Drive, Google Docs, Google Static Maps, Google Cloud Compute, etc.). When you create a service account, you typically have to specify which service(s) it has access to. The general rule of thumb is to only give the service account only those permissions that it will need for your Shiny app. If you need additional or different services for another R project, you simply create additional service accounts.
Depending on the platform and the service, you can dial in permissions even further. AWS has extremely fine grained permissions across all of their services, including S3. For example if all you need is for your Shiny app to upload a log file at the end of the session, you can give the IAM account permission to save files to one and only folder, in one and only one S3 bucket, with no read permissions at all. That way even if someone hijacked the service account, all they could do is upload files, and not see anything that is already there.
4. Keep Your Credentials Away from Your Code
It should be no surprise that putting your passwords in your code is a bad idea (although we’ve all done it!). If you’re working on your laptop or a server that you control, a common best practice is to store your passwords as environment variables (i.e., in your .Renviron file), and bring them into your script via Sys.getenv(). For stronger security, you can use a package like keyring that has functions to save credentials within the operating system. Another option is to store your credentials in an external file, such as a JSON or text file. This last one is in fact is what we have to use for publishing a Shiny app on ShinyApps.io, as described below.
Keeping your credentials out of your code allows you to safely use version control and share you code with colleagues (two other best practices). But this requires you take precautions that they don’t accidentally get “checked in” to a version control system (i.e. GitHub). This kind of unintentional escape is actually far more common than malicious hackers breaking into your server. To prevent credentials from being saved to GitHub, you need to either keep then out from the project folder, or configure your version control system to ensure they don’t get checked-in.
In the case of a Shiny app on ShinyApps.io, credentials do in fact need to be included among the files you upload when you publish the app. This is because ShinyApps.io doesn’t allow you to set up environment variables on the server (in part because you’re not using your own dedicated server but rather a VM running on a shared server). Other hosting services may allow you to set up environment variables, which you should definitely take advantage of when available.
For ShinyApps.io, we’ll do the next best thing which is to put the credentials in an external file. What that file looks like and how we create it depends on the platform (see below). This will allow us to check our code into GitHub, as long as we don’t don’t check in the credentials file. You can request Git to not check-in certain files by adding them to a file called .gitignore. Every repo (i.e., directory) can (and should) have its own .gitignore file.
A suggested practice is to create a subdirectory within your Shiny project directory called .secrets, and add that to .gitignore. Then you can just dump all your credential files in there and not have to worry about what their file names are, because everything in that folder will be excluded from GitHub. You then import the credentials into app.R with some kind of read function (e.g., readLines(), readRDS(), jsonlite::read_json()). And of course the .secrets folder and all its contents also need to be uploaded to ShinyApps.io when you publish your app.
Just remember to add the .secrets folder to .gitignore before you make the initial commit. For convenience, you can also add .secrets to the ‘global’ .gitignore. This is usually in your operating system’s ‘user’ folder, or you can open the global .gitignore in RStudio by running usethis::edit_git_ignore(). It is a good idea to also add .secrets to the repo’s .gitignore, for the benefit of any collaborators who might clone or fork your project.
Configuring AWS S3
AWS Simple Storage Service (Amazon S3) is a high performing object storage service in the cloud. You can try it out at no cost for 12 months (up to 5GB) with a new AWS account (see AWS Free Tier for details). After that, you’re charged on a pay-as-you-go basis (which is still quite cheap for modest amounts of data).
The steps in setting up S3 to transfer data from R are listed below (you don’t have to do them in this exact order):
- Create a new S3 bucket
- Create ‘folders’ within the bucket (if desired)
- Set permissions for the bucket folders to be “public” (if you want the files to be available to anyone) or “private”
- Create a new IAM user
- Create a ‘policy’ that gives the IAM user permissions to write to the bucket
In the following example, we’ll set up a S3 bucket that has a public folder (for example for PNG files that you might want to use in a Shiny dashboard), and a private folder (e.g., for log files). We’ll then create an IAM account that we can use in R to transfer files to S3.
1. Create a new S3 Bucket
Log into AWS1 using either your root credentials or an IAM account with administrative privileges (preferred).
Find your way to the S3 console, and click the ‘Create Bucket’ button.
Under ‘General Configuration’, select the region where most of your users are located, and give your bucket a unique name (across the entire AWS ecosystem!). Note that bucket names can not contain uppercase characters or underscores, but you can use hyphens (more info). A good way to make your bucket name globally unique is to add some random characters at the end.
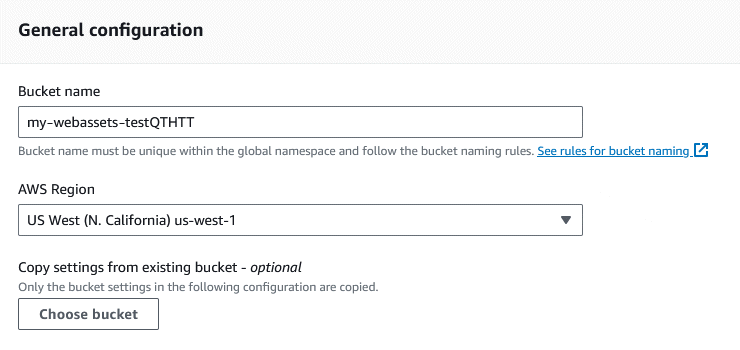
In the ‘Object Ownership’ section, keep the default setting that disables ACLs (we won’t need them because we’ll be handling bucket permissions using Policies).
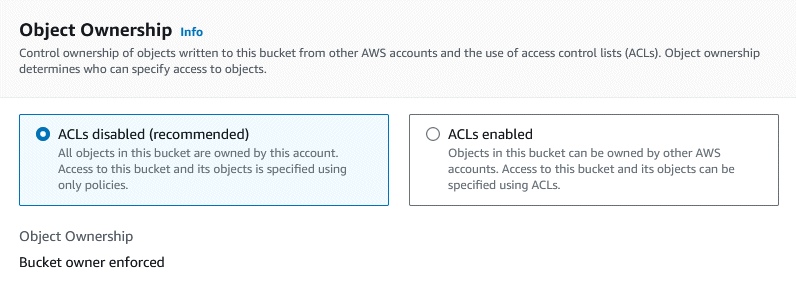
Next, the ‘Block All Public Access’ setting allows you to quickly and permanently block public access to the bucket (overriding everything else). In our case, we want one of the folders in the bucket to be public, so blocking all access would be overkill. However we can keep the first two blocking options, which block public access via ACLs (which we’re not using).
An important note here is that unchecking “Block Public Access” does not mean your bucket is now public. Everything is still private by default. It just means you have the ability to create a Policy object that makes some or all of the bucket files public.
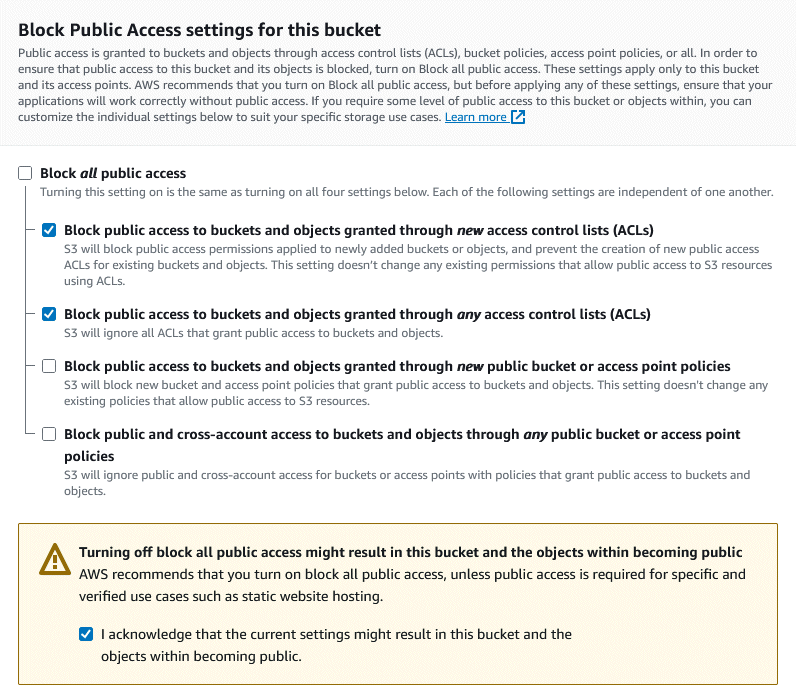
The remaining settings on the bucket configuration page are up to you.
Enabling Bucket Versioning - probably a good idea if you’ll be adding / updating files programmatically. If your script accidentally overwrites a file with garbage, you’ll be able to get the original back.

Tags can help you track the costs of operations related to this bucket, which is probably a good idea so you can track the total costs of your Shiny app or website.

The Default Encryption is probably fine (unless your web assets are particularly sensitive). You can change it if you’d like.
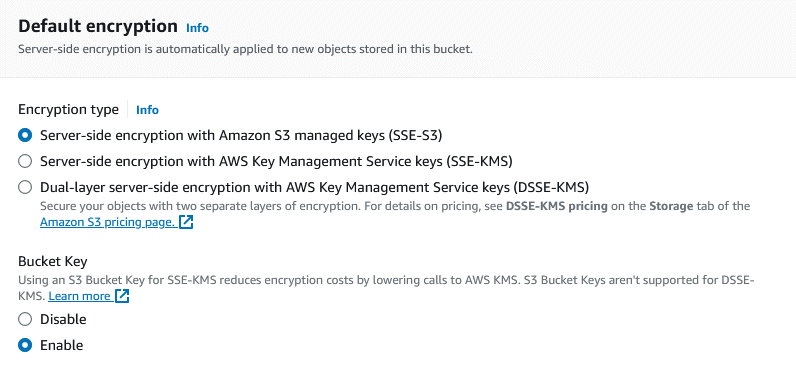
When you’re all done, click the ‘Create Bucket’ button. If your bucket name is not globally unique or uses illegal characters, you’ll be prompted to fix it. Aside from the bucket name, most of the other settings can be changed later.
2. Create Folders in Your Bucket (optional)
Folders are flexible and intuitive way to organize data. If your bucket will hold different kinds of files (e.g., images, reports, log files, data files), you might want to create folders to organize them. (You could also create separate buckets for each kind of data). Another reason you might want to use folders is if you have lots of files that have natural groupings, for example by year, project, or location. You might also use folders if you want some of the files to be public but others, or if there are files that should only be accessible by certain IAM users (i.e., scripts).
In this example, we’ll create a folder for the files that we want to be public (i.e., image files for our Shiny dashboard), and another folder for files that we want to keep private. To begin, find the bucket in the S3 dashboard and click on it to open it.
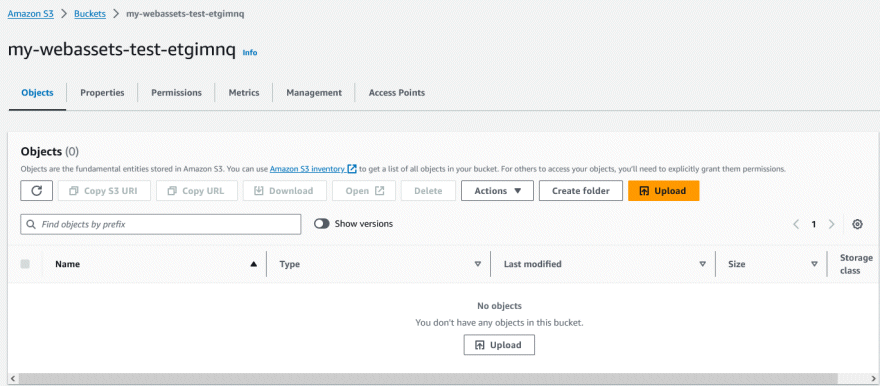
To add a folder, click on the ‘Create folder’ button. Here we’ve added folders for images (that will be public) and db for database files (that will not be public).

‘Folders’ in a S3 bucket are not true directories like you have on your hard drive. Rather, they are more like parts of the file name that use a syntax inspired by paths in traditional file systems (i.e., a series of strings separated with forward slash characters /). Despite this ‘mimicry’, folders are still very useful for organizing your data, and supported by many of S3’s file management utilities.
Next, click on the Properties tab and find the Amazon Resource Name (ARN). An ARN a bit like a URL in the AWS universe, so save it as we’ll need it later. The ARN will look like:
arn:aws:s3:::my-webassets-test-etgimnq
3. Make One of the Folders Public
As of right now, nothing in the bucket is publicly accessible. Even though we told it to not to apply a blanket prohibition against public access when we set up the bucket, the default setting for S3 objects is private. In this step, we’ll create a Policy that makes one of the folders public, so web apps (including our Shiny app) can use the assets in that folder without the need to authenticate.
First, under the bucket ‘Permissions’, verify that ‘block all public access’ remains unchecked (which you set above ^^^), and that the last two options blocking the use of policies are also unchecked.

Scroll down to Bucket policy, and click ‘Edit’. This is where we’ll create a Policy that will allow the objects (files) in the ‘images’ folder to be public. A Policy is like a permission slip that specifies who can do what in the very broadest sense.
In the Policy editor, paste the JSON code below, swapping in your own ARN for the ‘Resource’. Make sure there are no blank lines at the top. When done, click the orange ‘Save Changes’ button at the bottom.
{
    "Version": "2012-10-17",
    "Statement": [
        {
            "Sid": "AddPerm",
            "Effect": "Allow",
            "Principal": "*",
            "Action": "s3:GetObject",
            "Resource": "arn:aws:s3:::my-webassets-test-etgimnq/images/*"
        }
    ]
}
The details of constructing a JSON expression for a Policy are beyond the scope of this Tech Note, but there are lots of tutorials available.
An important detail we see above is the "/*" at the end of the ARN. This wildcard character means the “Allow GetObject” permission goes to the objects (i.e., files) inside that folder. The policy doesn’t assign any permissions to the folder itself (such as get a listing of the files), so the web app will need to know the full name of the file it wants.
To verify the policy works, go back to the ‘Objects’ tab, click into the ‘images’ folder (that you just made public), and upload a PNG file from your hard drive. After it’s uploaded, click on the file name to preview its properties. You’ll see the Object URL. Copy the object URL and paste it in another browser to verify the PNG file is actually open to the public.
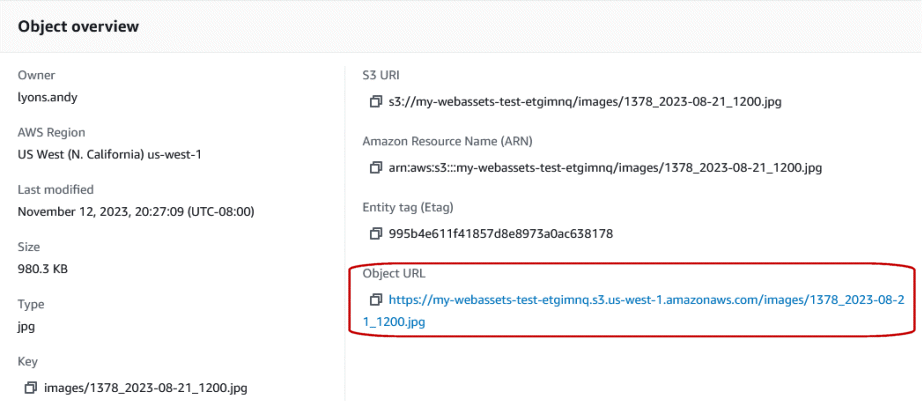
For example, try opening:
We’re done with S3! (at least for now). Next we’ll create an IAM User Account that we can use in R, and give it permission to read and write to all folders in the bucket.
4. Create an IAM User
As noted above, you never want our script to authenticate using your main credentials (aka Root account). So to transfer files from to and from S3, next you’ll need to create an IAM account (the AWS equivalent of a Service Account).
Go to the IAM Control panel, and click ‘Create New User’. Enter a user name that will help you remember what this IAM account is intended for. IAM usernames can have up to 64 characters. Valid characters are: A-Z, a-z, 0-9, and + = , . @ _ - (hyphen). Unlike S3 bucket names, they do not have to be globally unique.

Note above how we have left “Provide user access to the AWS Management Console” unchecked. This is because we are creating this IAM User exclusively for programmatic access from R using the AWS API. In other words, we’ll never log into the AWS web portal with this IAM user, so there’s no need to give it access to the Console.
On the ‘Set permissions’ page, don’t assign any permissions. We’ll do that later. Just click ‘Next’. On the next screen, you can add a tag if you’d like (i.e., to help with billing). Otherwise, just click ‘Create user’.
Once the user is created, click on the name to sees it properties. The first thing to take note of is the ARN, which you should copy down:

5. Give the IAM User permissions to your bucket
Next, we’ll give the IAM User permissions to read and write files in the bucket. The key here is to give the IAM account the absolute minimum level of permissions. We could limit permissions to specific folders, but in this case we’ll grant permissions for the entire bucket because our R script will need to save files to both the “images” folder as well as the “db” folder.
On the Permissions policies tab, click on ‘Add permissions’ then ‘Create inline policy’.

Click on the ‘JSON’ button to get to the Policy Editor, then copy-paste the following (changing the ARN’s to your own):
{
    "Version": "2012-10-17",
    "Statement": [
        {
            "Sid": "VisualEditor1",
            "Effect": "Allow",
            "Action": [
                "s3:ListBucket",
                "s3:GetBucketLocation"
            ],
            "Resource": "arn:aws:s3:::my-webassets-test-etgimnq"
        },
        {
            "Sid": "VisualEditor2",
            "Effect": "Allow",
            "Action": [
                "s3:PutObject",
                "s3:GetObject",
                "s3:DeleteObject"
            ],
            "Resource": "arn:aws:s3:::my-webassets-test-etgimnq/*"
        }
    ]
}
This is a pretty narrow set of permissions. We are giving the IAM user just enough permissions to do what it needs to do in Shiny, and nothing more. Some notes about the JSON expression:
one chunk of the JSON grants permissions to the bucket, and another chunk grants permissions to the objects in the bucket (because the __“/*“__ at the end)
the ARNs do not include any folder names, so the permissions are being applied to the entire bucket
s3:GetBucketLocationallows the IAM user to verify the bucket exists (on the R side, this will be needed when we runaws.s3::bucket_exists()).s3:ListBucketallows the IAM user to list the objects in the bucket (in this case the entire bucket).s3:PutObject,s3:GetObject,s3:DeleteObjectallows the user to add, read, and delete individual files in the bucket. Note also the resource for these permissions ends with the wildcard/*
Click ‘Next’. On the ‘Review and Create’ screen, give your policy a name that will help you remember what it allows. Then click ‘Create Policy’ when done.

The IAM User account now has permissions to read and write files to the entire bucket. All that is left now is create security credentials so your script can authenticate.
6. Create Security Credentials
Click on the IAM User in the IAM Management Console to view its properties. Then click on the Security Credentials tab.
You can ignore the Console sign-in link, because we didn’t enable Console access above. Scroll down to the ‘Access keys’ section, and click the ‘Create access key’ button. The next screen asks what your use case is. Select ‘Application Running outside AWS’.
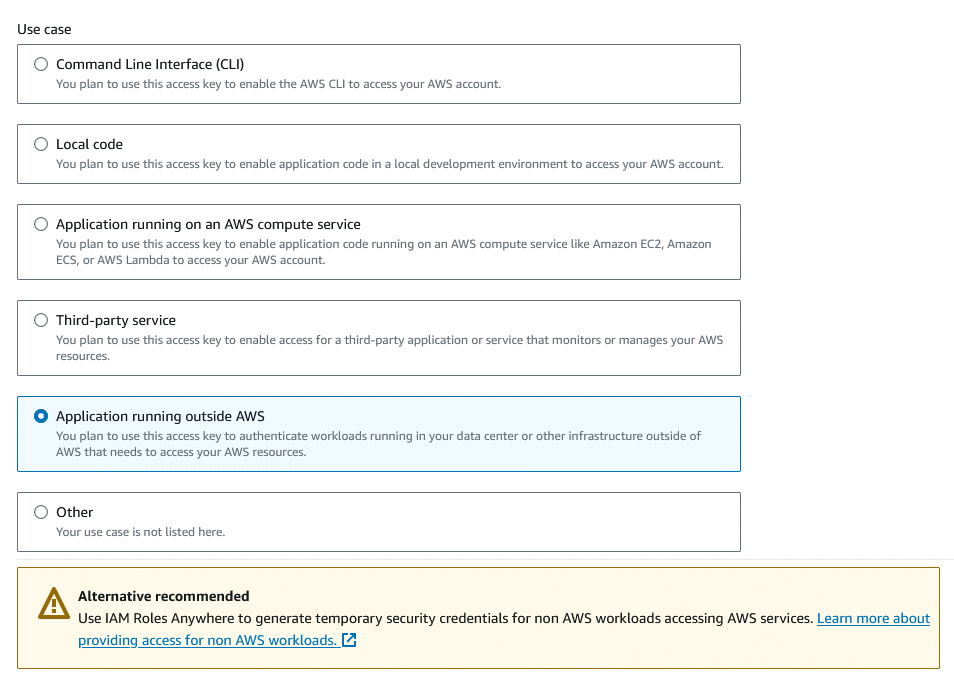
After you select your use case, click ‘Next’. Enter a description which will help you remember what this access key is for, then click ‘Create access key’.
On the next screen, download your Access key and Secret access key as a CSV file record, or copy-paste them somewhere else. Treat these like a user name and password, and do not lose them (there is no way to recover the secret access key). Click Done.
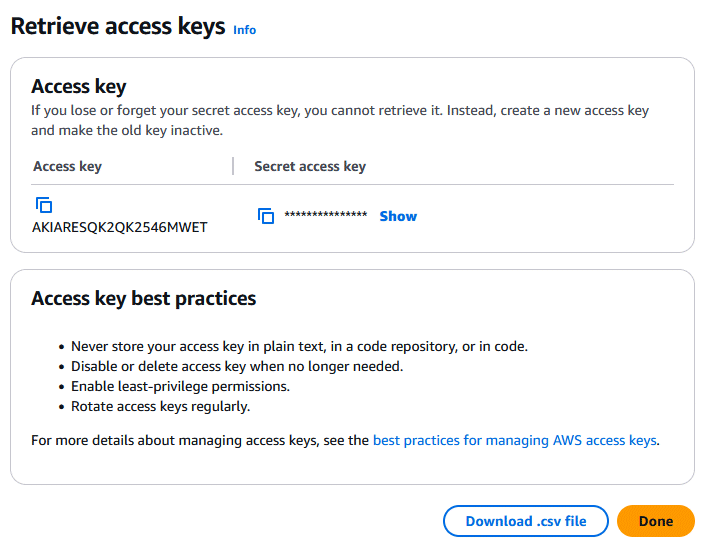
Be aware that the Access Keys for your IAM User do not have an expiration date. This means they will last for a very long time, so you must be extremely careful not to let them get loose!
We are done setting up the IAM User Account. We can now start scripting!
Transfer Files To/From S3 from R
Finally, we get to write R code to transfer files to/from S3. There are at least two R packages that provide wrappers to the AWS S3 API, including aws.s3, and paws. Below we’ll use aws.s3. This is an older package, and it may no longer be maintained, but it still works for now.
Load Credentials
The first step is to load the access key and secret access key into R. Assuming you downloaded the keys as a CSV file (see above), and stored it in a sub-directory called .screts (see also above), you can load them into R as follows:
my_keys_df <- read.csv("./.secrets/iam-s3-manage-webassets_accessKeys.csv")

my_keys_df$Access.key.ID
[1] "AKIARESQK2QKYDNN4IA5"my_keys_df$Secret.access.key |> nchar()[1] 40You could of course save them to disk as text or rds files, or save them as environment variables if that’s an option (which it isn’t on ShinyApps.io).
Next, following the documentation from aws.s3, we store the keys as environment variables that the various functions in aws.s3 will look for.
Sys.setenv("AWS_ACCESS_KEY_ID" = my_keys_df$Access.key.ID,
           "AWS_SECRET_ACCESS_KEY" = my_keys_df$Secret.access.key,
           "AWS_DEFAULT_REGION" = "us-west-1")
Check Bucket
First, let’s check if our bucket exists. For this, we’ll need to construct the “S3 URI” for the bucket, which is simply s3:// + bucket name. We’ll feed that into bucket_exists(), along with the region the bucket is located in:
library(aws.s3)

s3_bucket_uri <- "s3://my-webassets-test-etgimnq/"

aws.s3::bucket_exists(s3_bucket_uri, region = "us-west-1") |> as.logical()
[1] TRUE
Download and Upload Files
To download a file from S3, we can use get_object() to bring it into memory, or save_object() to save it to disk.
Here, we’ll download a JPG file saved in the ‘images’ folder 2.
## Download and save the image
file_saved_fn <- aws.s3::save_object(object = "images/cute-gerbil_300x300.jpg",
                                     bucket = s3_bucket_uri,
                                     file = "~cute-gerbil.jpg")

## Display it
knitr::include_graphics(file_saved_fn)
Lastly, we’ll upload a file to S3:
## Create a PNG file in the temp directory
temp_png <- tempfile(fileext = ".png")
png(temp_png)
plot(x = rnorm(1000), y = rnorm(1000), col = topo.colors(1000), pch = 20, cex = 2)
dev.off()
png
2 ## Upload it to S3
aws.s3::put_object(file = temp_png,
object = paste0("images/test_plot.png"),
bucket = s3_bucket_uri)[1] TRUE
Verify it worked:
## Download and save the test plot
test_plot_fn <- aws.s3::save_object(object = "images/test_plot.png",
                                    bucket = s3_bucket_uri,
                                    file = "~test_plot_downloaded_from_s3.png")

## Display it
knitr::include_graphics(test_plot_fn)
Conclusion
AWS S3 provides fast, affordable cloud storage for R projects. This is particularly useful for Shiny apps hosted on ShinyApps.io, which doesn’t provide persistent storage across sessions. The steps we worked through to set this up include:
- Creating an S3 bucket on AWS, and creating folders if needed.
- Creating a Policy to make some of the folders publicly accessible (if needed for web apps).
- Creating an IAM User that your R script can use to log in.
- Creating a Policy that grants the IAM User permissions to read/write to the bucket.
- Creating security credentials for the IAM User, and saving them in an external file.
- Using functions from the
aws.s3package to upload and download files from S3.
Footnotes
Although your AWS account and services may be connected to a specific region, you can log-in to the Console from the main AWS page.↩︎
This file is actually public to anyone with the link, so we could also get it with functions like
utils::download.file()↩︎

